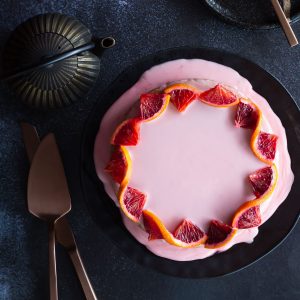
Whole Blood Orange Cake
A beautiful, zesty and seasonal cake to bake at the end of Winter and during Spring. Using whole blood oranges creates a special cake that's deceptively easy but always delicious. This cake is naturally gluten-free, dairy-free, Paleo-friendly and just perfect for your next afternoon tea. The recipe is easy to make with a short ingredient list and includes options to cook in your Instant Pot/Multicooker or the oven.
Print
Pin
Servings: 12
Equipment
- Food processor or blendercooling rack*trivet,
- Chopping board and knife
- Spoon
- Instant Pot/multicooker/pressure cooker* OR an oven and a large saucepan/stockpot
- 18cm/7 inch or 20cm/8inch cake pan (for Instant Pot option - size depends on your model) OR 23cm/9 inch cake pan for the oven (a cheesecake pan works well too)
- Baking paper
- Aluminium foil for the Instant Pot/multicooker/pressure cooker option
Ingredients
Cake
- 680 grams blood oranges (2 medium and 2 small blood oranges or 1.5 lbs)
- 325 grams fine almond flour (3 cups. Not almond meal)
- ¾ - 1 cup raw sugar (aka turbinado. White granulated sugar is also fine to use)
- 1 ¼ teaspoon gluten free baking powder
- ½ teaspoon cooking salt
- 4 large eggs (at room temperature)
Glaze and decoration
- 500 grams blood oranges (4 small to medium or 1.1 pounds)
- 2 cups icing sugar/confectioner's sugar
- ½ teaspoon honey (optional)
Instructions
Instant Pot/Multicooker/Pressure Cooker
- Add 2 litres cups of water to the inner pot - fresh boiled water will bring the pressure up more quickly.
- Lock the lid, set to cook at high pressure for 10 minutes.
- Once the time is up, release pressure immediately, remove the oranges and set aside to cool.
- Allow to cool, cut in half.
- Remove any seeds, and the pedicels/stem ends (the parts that are where the orange is attached to the tree - you can pull them off).
- Place the orange halves in the food processor and blend well for a couple of minutes until most of the peel isn’t visible - it’s ok if there are still some visible pieces. Remove and discard any large segment walls you can see and do a final check to remove and discard seeds.
- Add the dry ingredients, blend again for a minute or two.
- Add the eggs and blend again. Scrape the sides down and blend again for 30 seconds. The batter will be relatively wet, this is normal.
- Grease and line an 18cm/7in or 20cm/8in cake pan with baking paper. Create a sling with aluminium foil. Place the cake pan on top of the sling.
- Pour the batter in to the cake pan.
- Smooth/even the top and spray lightly with oil.
- Cut a square of baking paper that will be large enough to cover the cake tin. Spray with oil, place the oiled side down over the cake pan and then place foil on top of that. Pinch the foil to help tighten it around the edges of the cake pan.
- Trim excess baking paper/foil and pinch/fold the foil tight again.
- Add 2 cups of fresh boiled water to the inner pot of the Instant Pot/pressure cooker.
- Place a trivet inside the inner pot.
- Pick up the cake pan by both sides of the sling - holding close to sides the pan - and then lower it into the inner pot to sit on the trivet. It may be a bit of a tight squeeze, ensure the cake pan is sitting flat and not on an angle.
- Fold the sides of the sling down over the top of the cake so the lid can be placed on the Instant Pot/pressure cooker correctly.
- Close and lock the lid, set the valve to seal and set the pressure cooker to cook on high for 60 minutes. Once the time is up, allow the pressure to release for 10 minutes.
- Open up the pressure cooker and - using gloves or a kitchen towel - carefully lift up the folded-over sling arms and lift out the cake tin with the sling.
- Place on a cooling rack and allow to cool for 2+ hours in the tin. The cake should only be sliced once it is completely cool. I recommend placing it in the fridge to help it set further to prevent breaking.
- Bring to room temperature before glazing, decorating and serving - this usually takes a couple of hours outside of the fridge.
- Store in the fridge for up to 4 days. FYI, the glaze/icing tends to separate after a while.
Stove top/Oven
- Cook oranges for 40 minutes in a stockpot with plenty of water, then remove from the water and set aside to to cool. If your oranges are small, they may only need 30 minutes - check at that point. If a knife goes through easily, they are ready. Cut in half and then remove any seeds, and the pedicels/stem ends (the parts that are where the orange is attached to the tree - you can pull them off).
- Preheat the oven to 170C/340F.
- Place the orange halves in the food processor and blend well for a couple of minutes until most of the peel isn’t visible - it’s ok if there are still some visible pieces. Remove and discard any large segment walls you can see and do a final check to remove and discard seeds.
- Add the dry ingredients, blend again for a minute or two.
- Add the eggs and blend again. Scrape the sides down and blend again for 30 seconds. The batter will be relatively wet, this is normal.
- Grease and line a cake pan. I recommend a size around 23cm/9 inches - a cheesecake pan will work as will a regular pan.
- Pour the batter in to the pan.
- Smooth/even the top and spray lightly with oil.
- Bake for 60 minutes and allow to cool completely in the pan before adding the glaze and serving. If using a cheesecake pan, I recommend removing the cake carefully by running a butter knife around the edge of the pan and carefully tipping the cake out (put a plate on top and flip it out) without releasing the latch on the cake pan. If making the cake the day before serving, store in the fridge and then bring to room temperature for a couple of hours before adding the glaze/icing.
Create the glaze and decorations
- Create the glaze only when the cake is completely cooled, and has come to room temperature. For best results, glaze the bottom of the cake not the top (as it's smoother).
- Sift the icing sugar/powdered sugar into a medium bowl. Add 2 tablespoons blood orange juice and ½ teaspoon honey if using. Stir with a large spoon to combine. Add ¼ teaspoon blood orange juice at a time as needed until your glaze is smooth, but still very thick - don't rush this by adding in too much. When you pick up your spoon, look for a drizzle of icing to stay on the surface of the bowl for about 10 seconds before it starts to melt back into the icing. If your icing is too thin, add more powdered sugar. If it's too thick, add more blood orange juice until you get the ideal consistency.Before pouring, tap the bowl on the kitchen bench a few times which will help remove any hidden air pockets in the icing.
- Pour the glaze over the cake - you may need to move it in a circular motion to help it cover the cake evenly.
- To make the blood orange decoration...slice blood oranges into 5mm thick slices. Cut those slices in to semi-circles then pat dry on both sides with paper towel - this prevents any bleeding.Cut a slit in the middle of the flesh up to the pith line. Twist the semi circle so you can see the zest curved on top. Place some of the twisted semi-circles carefully on the outer edge of the cake.