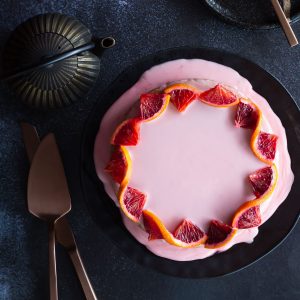
Seasonal eating is so enjoyable when you can make this wonderful, zesty Whole Blood Orange Cake. Using the whole of the orange creates a special cake that's deceptively easy but always delicious. This cake is naturally gluten-free, dairy-free, Paleo-friendly and just perfect for your next afternoon tea. The recipe is crazy easy to make, has a super short ingredient list and includes options to cook in your Instant Pot/Multicooker or the oven. What's not to love?!
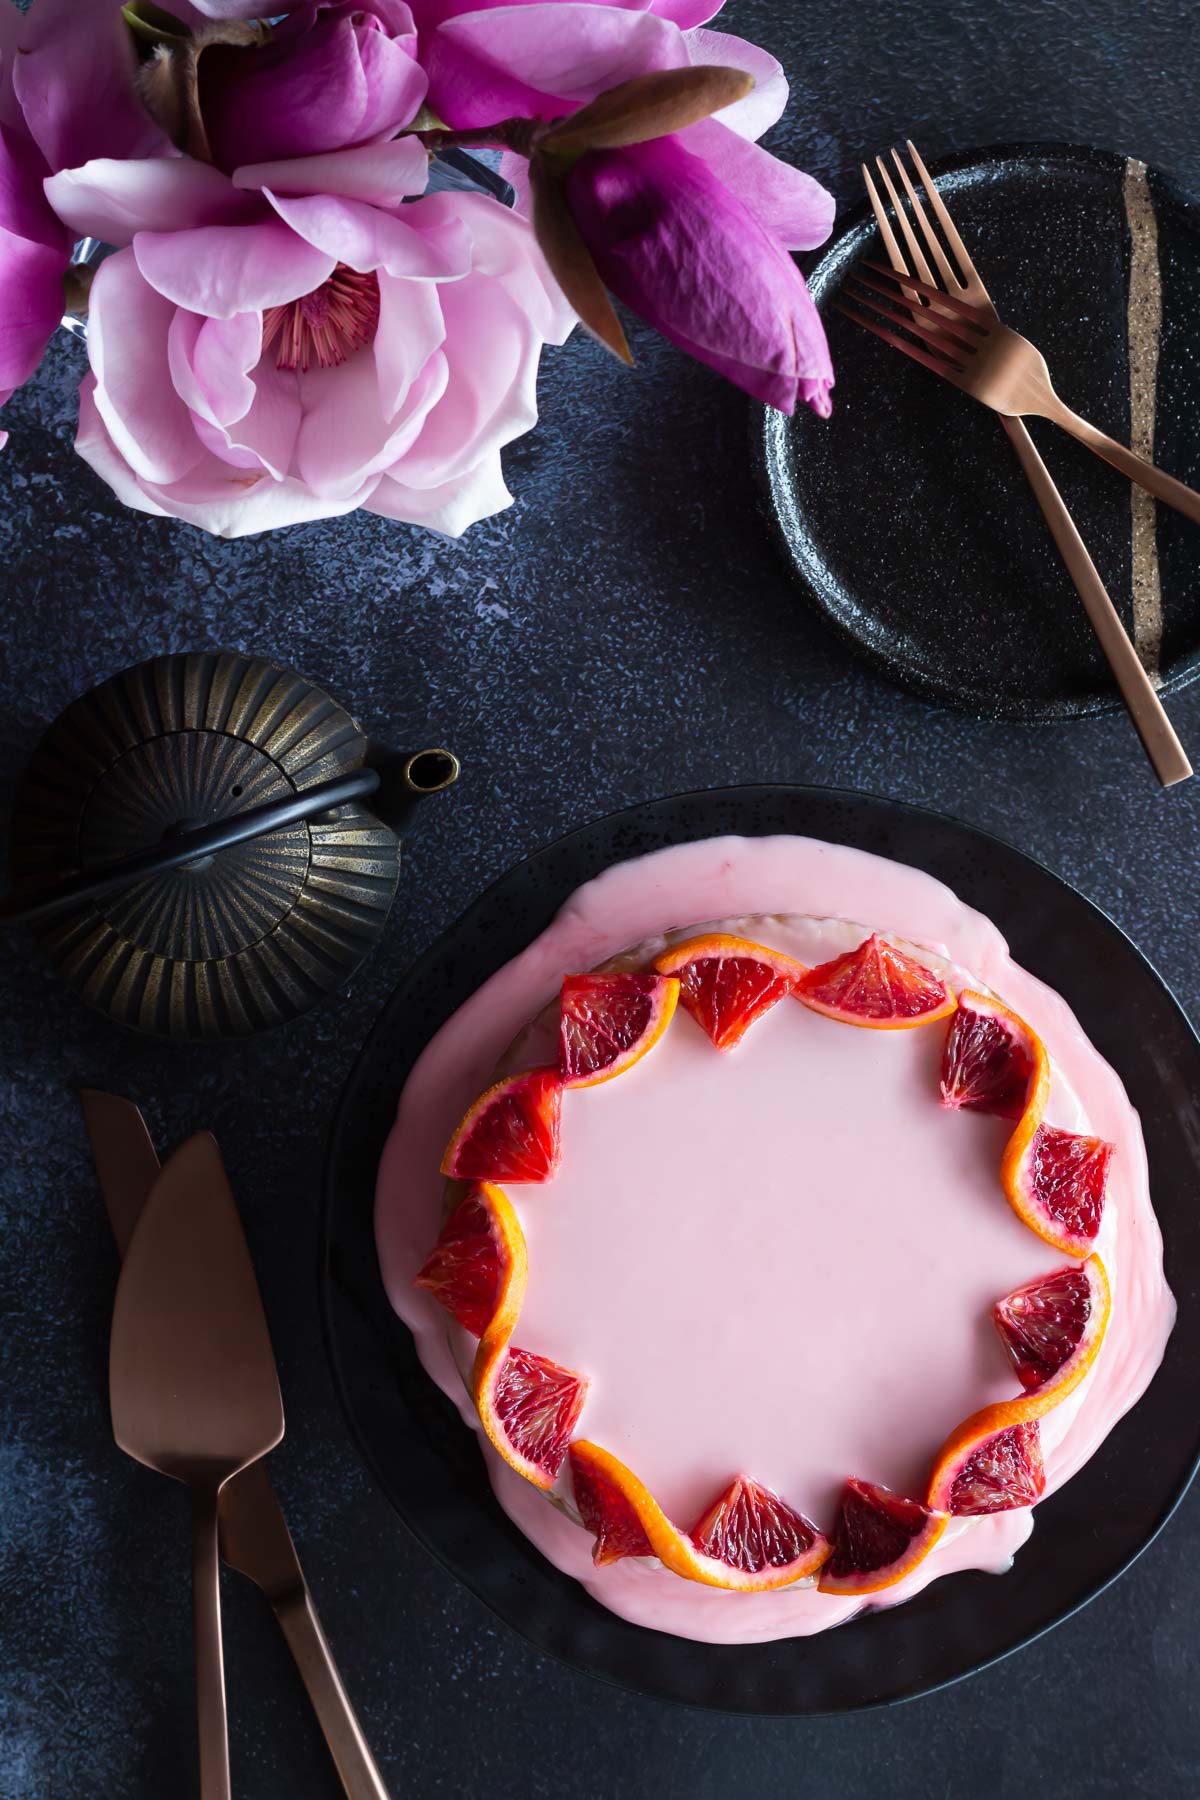
Blood oranges have a short season every year from mid-Winter (late July) until mid-Spring (October), so it's important to get in quickly while you can still find them. It's fair to say that I've gone a little crazy for blood oranges the last couple of years. I'm also working on a Blood Orange Sherbet recipe that will be available very soon and is perfect for those warmer Spring days. Blood oranges have a beautiful floral flavour and a lovely pink juice that creates a striking baby pink glaze contrasted with a blood orange decoration.
Jump to:
- 📝 Ingredients
- 🥣 Equipment
- Before we get to the recipe, sign up to the email list
- 💜 What you'll love about this cake
- 🍰 How to make this cake in your Instant Pot/Multicooker
- ⏲️ How to bake in the oven
- 👩🏼🍳 Tips to get the best results
- 💥 Using a blender if you don't own a food processor
- Other options instead of a glaze
- 🍊 How to make the patterned orange decoration on top of the cake
- 🍫 How to make a chocolate water ganache
- 😋 Variations
- 🧡 Storage
- 🍰 Looking for more gluten-free cake inspiration?
- 💥 Recipe
- Whole Blood Orange Cake
- 🍮 Other sweet recipes you'll love!
📝 Ingredients
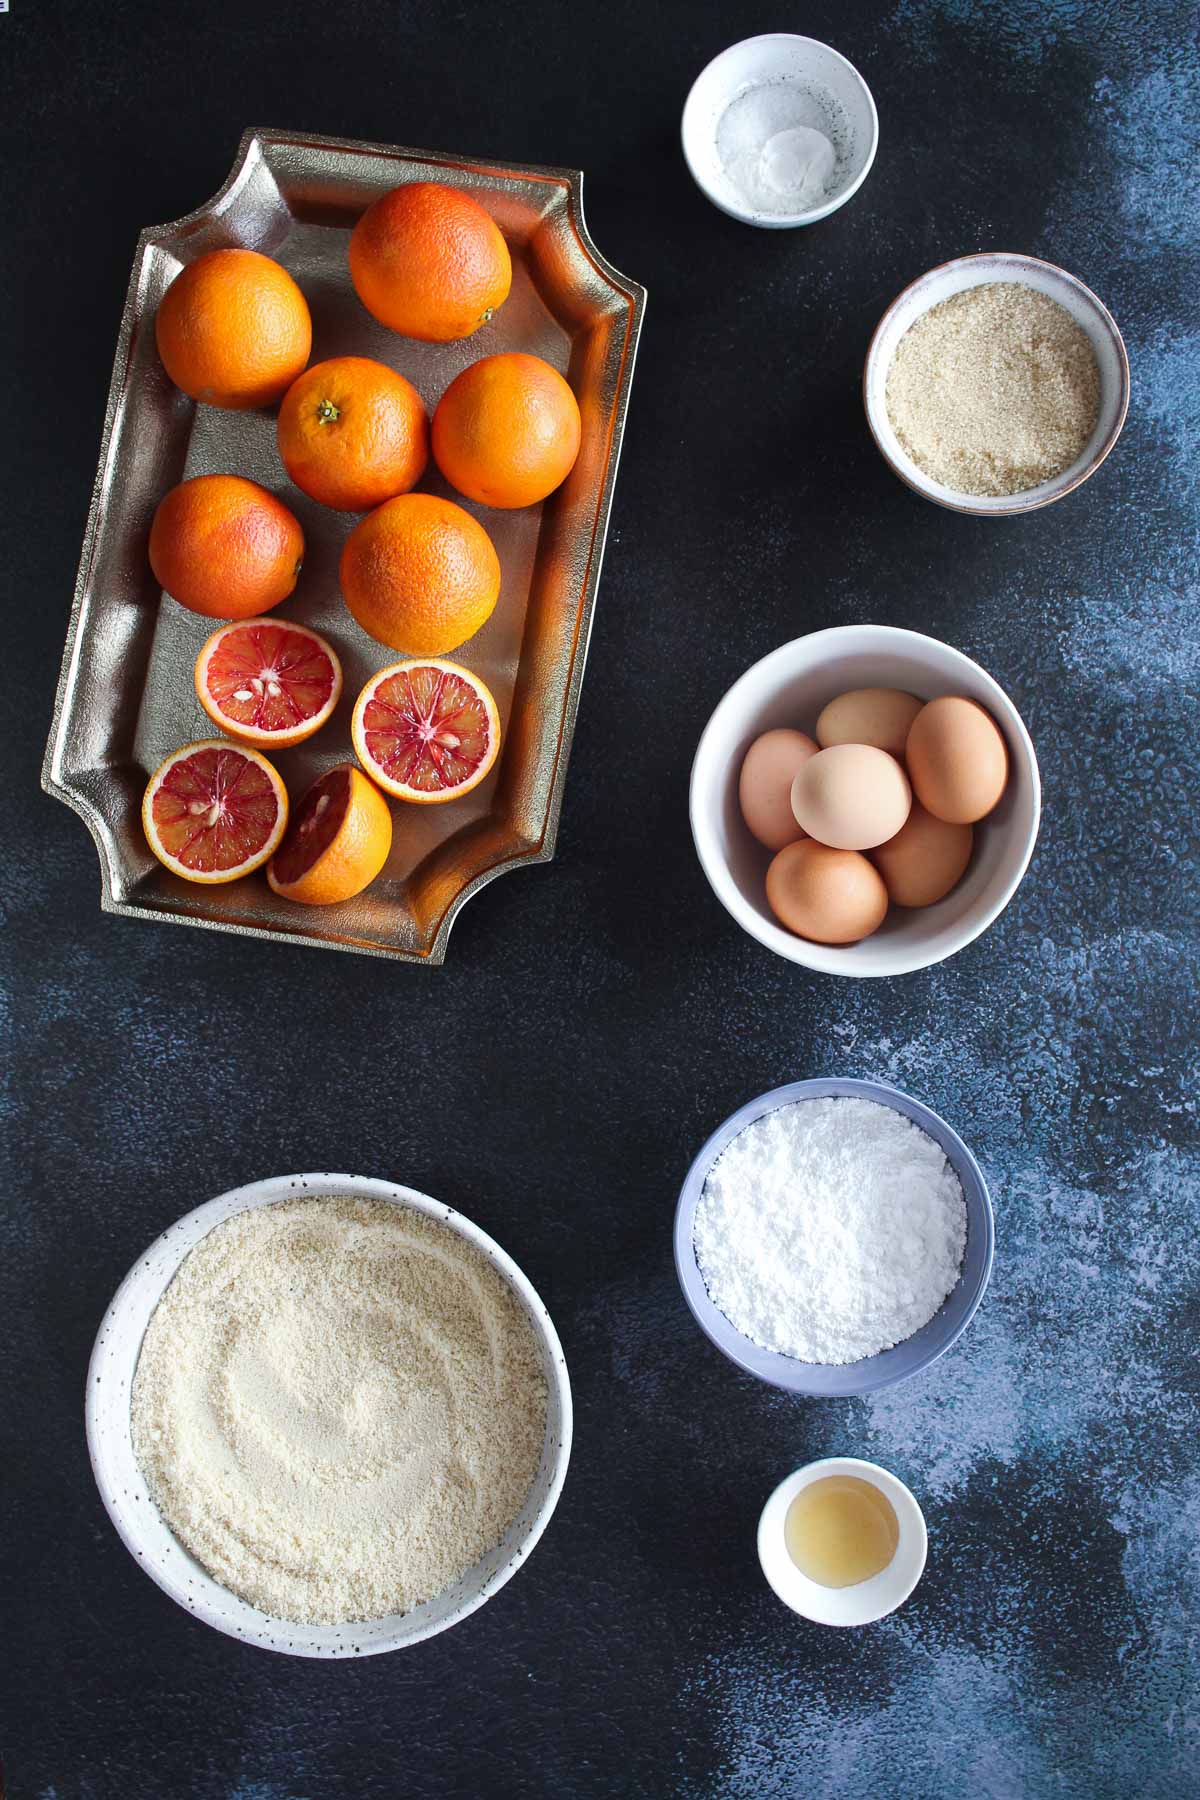
- Blood oranges
- Almond flour
- Raw sugar or white/granulated sugar
- Gluten-free baking powder
- Cooking salt
- Large eggs
- Icing sugar, extra blood oranges and optional honey for the glaze
See recipe card for quantities.
🥣 Equipment
- Food processor or blender
- Chopping board and knife
- Spoon
- Instant Pot/multicooker/pressure cooker* OR an oven and a large saucepan/stockpot
- 20cm/8inch cake pan (for Instant Pot option) OR 23cm/9 inch cake pan for the oven (a cheesecake pan works well too)
- cooling rack
- *trivet, baking paper and aluminium foil for the Instant Pot/multicooker/pressure cooker option
Before we get to the recipe, sign up to the email list
Never miss another recipe or article!
💜 What you'll love about this cake
I believe this style of cake was first created by Claudia Roden and has had many cakes inspired by it since. This is my version, using seasonal blood oranges and less sugar than is normally included.
- It's super easy to make
- Make it in either your Instant Pot/multicooker/pressure cooker or your oven
- Zesty and delicious
- Sticky and dense
- Super impressive decoration possibilities

🍰 How to make this cake in your Instant Pot/Multicooker
Note:
This cake can also be made in the oven.
Please read the recipe card for full details. You can also check out the Process shots below which show you the main steps.
Baking a cake in the Instant Pot/Multicooker is a great option! This is the type of cake that's perfect for this cooking method, since it's dense and moist as opposed to a sponge cake for example. The benefit of baking this Whole Blood Orange cake in the Instant Pot/Multicooker is that you can avoid heating up the house where you are, bake it on location if you don't have access to an oven and it's also energy-efficient compared to an oven. It's a win-win!
Below I've provided step-by-step images for baking in the Instant Pot/multicooker since many people may not be familiar with this cooking technique. You will need either a 7 inch (18cm) or 8 inch (20cm) cake tin. Be aware that some models of the Instant Pot and multicooker will only fit a 7 inch (18cm) size tin. I can fit an 8 inch (20cm) tin in mine.
Note: If you need the instructions for baking in an oven, see further down in this post.
- We start by pressure cooking the oranges and then setting aside to cool
- Once cooled, chop in half - remove the seeds and the pedicel/stem ends. Then place in the food processor or blender until the peel is in very small pieces. Check again for seeds and large segment walls to discard.
- Next, add the dry ingredients, blend again and then add the eggs before blending until smooth.
- Add the batter to your prepared cake pan, cover with oiled baking paper and foil.
- Add water to the inner pot, then the trivet.
- Make an aluminium sling and place under the cake pan. Lower the cake pan in to the inner pot to sit on the trivet. Fold the sling arms over the top of the cake so the lid will close fully.
- Seal the vent and set to cook on high pressure for 60 minutes. At the end of cooking, allow for 10 minutes natural release.
- Carefully remove the cake - using the sling - and allow to cool in the pan on a cooling rack for a couple of hours and then transfer to the fridge.
- When ready to serve, allow the cake to come to room temperature and then prepare and apply the glaze and decoration.

⏲️ How to bake in the oven
- Start by boiling the oranges for 40 minutes on the stove in a large saucepan or stockpot (if using smaller oranges, check at the 30 minute mark - if a knife goes through easily, they are ready). Remove the oranges from the water and set aside to cool.
- Preheat the oven to 170C/340F.
- Once the oranges have cooled, chop in half - remove the seeds and the pedicel/stem ends. Sometimes, blood oranges have no seeds - just check carefully. Then place in the food processor or blender until the peel is in very small pieces. Check again for seeds and large segment walls to discard.
- Next, add the dry ingredients, blend again and then add the eggs before blending until smooth.
- Add the batter to your prepared cake pan, bake the cake for 60 minutes on the middle rack.
- Remove the cake from the oven, allow to cool in the pan on a cooling rack for a couple of hours before removing from the pan.
👩🏼🍳 Tips to get the best results
- Buy enough blood oranges for both the cake itself, the glaze (or syrup) AND the decoration. I buy 1.3kg (approx. 2.9 pounds).
- Bake the cake the day before you want to serve it, since it needs time to cool completely before decorating and slicing. You may be able to make it first thing in the morning for afternoon tea, but that might be cutting things a little fine!
- Make the icing/glaze just before serving - it seems to separate if left for a few hours or more. I'm no cake expert, so I don't know why this is!
- The cake is best eaten soon after icing/glazing because the icing separates after some time (as mentioned above) - this problem doesn't occur with the sugar syrup option though.
- Glaze/ice the bottom of the cake rather than the top - the surface of the bottom is much more even
- If you're using a springform/cheesecake pan - don't release the latch at the end of baking as the cake might crack - just gently tip it out of the pan after it has cooled on to a cooling rack (you may need to run a butter knife around the edges first).

💥 Using a blender if you don't own a food processor
If you don't have a food processor, you can use a blender to blend the oranges and then the cake ingredients separately. Most blenders have a smaller capacity than a food processor, so the best way to go about this is to firstly blend the oranges, remove to a mixing bowl, and then blend the remaining ingredients. Finally, mix the two together in the mixing bowl before pouring the batter into your prepared cake pan.
Other options instead of a glaze
If you prefer not to make a glaze, there are so many other options to choose from:
- You can make a lovely blood orange syrup instead - just use this recipe that uses regular oranges (substitute with blood oranges). This would be great with the patterned orange decoration described below.
- The cake could be made as an upside down cake with blood orange slices laid out with the cake batter poured on top (needs lined a springform pan) - this recipe uses caramel to keep the blood oranges in place
- Chocolate ganache pairs very well with this cake
- My Easy Dairy Free Strawberry Frosting complements the blood orange flavour beautifully!
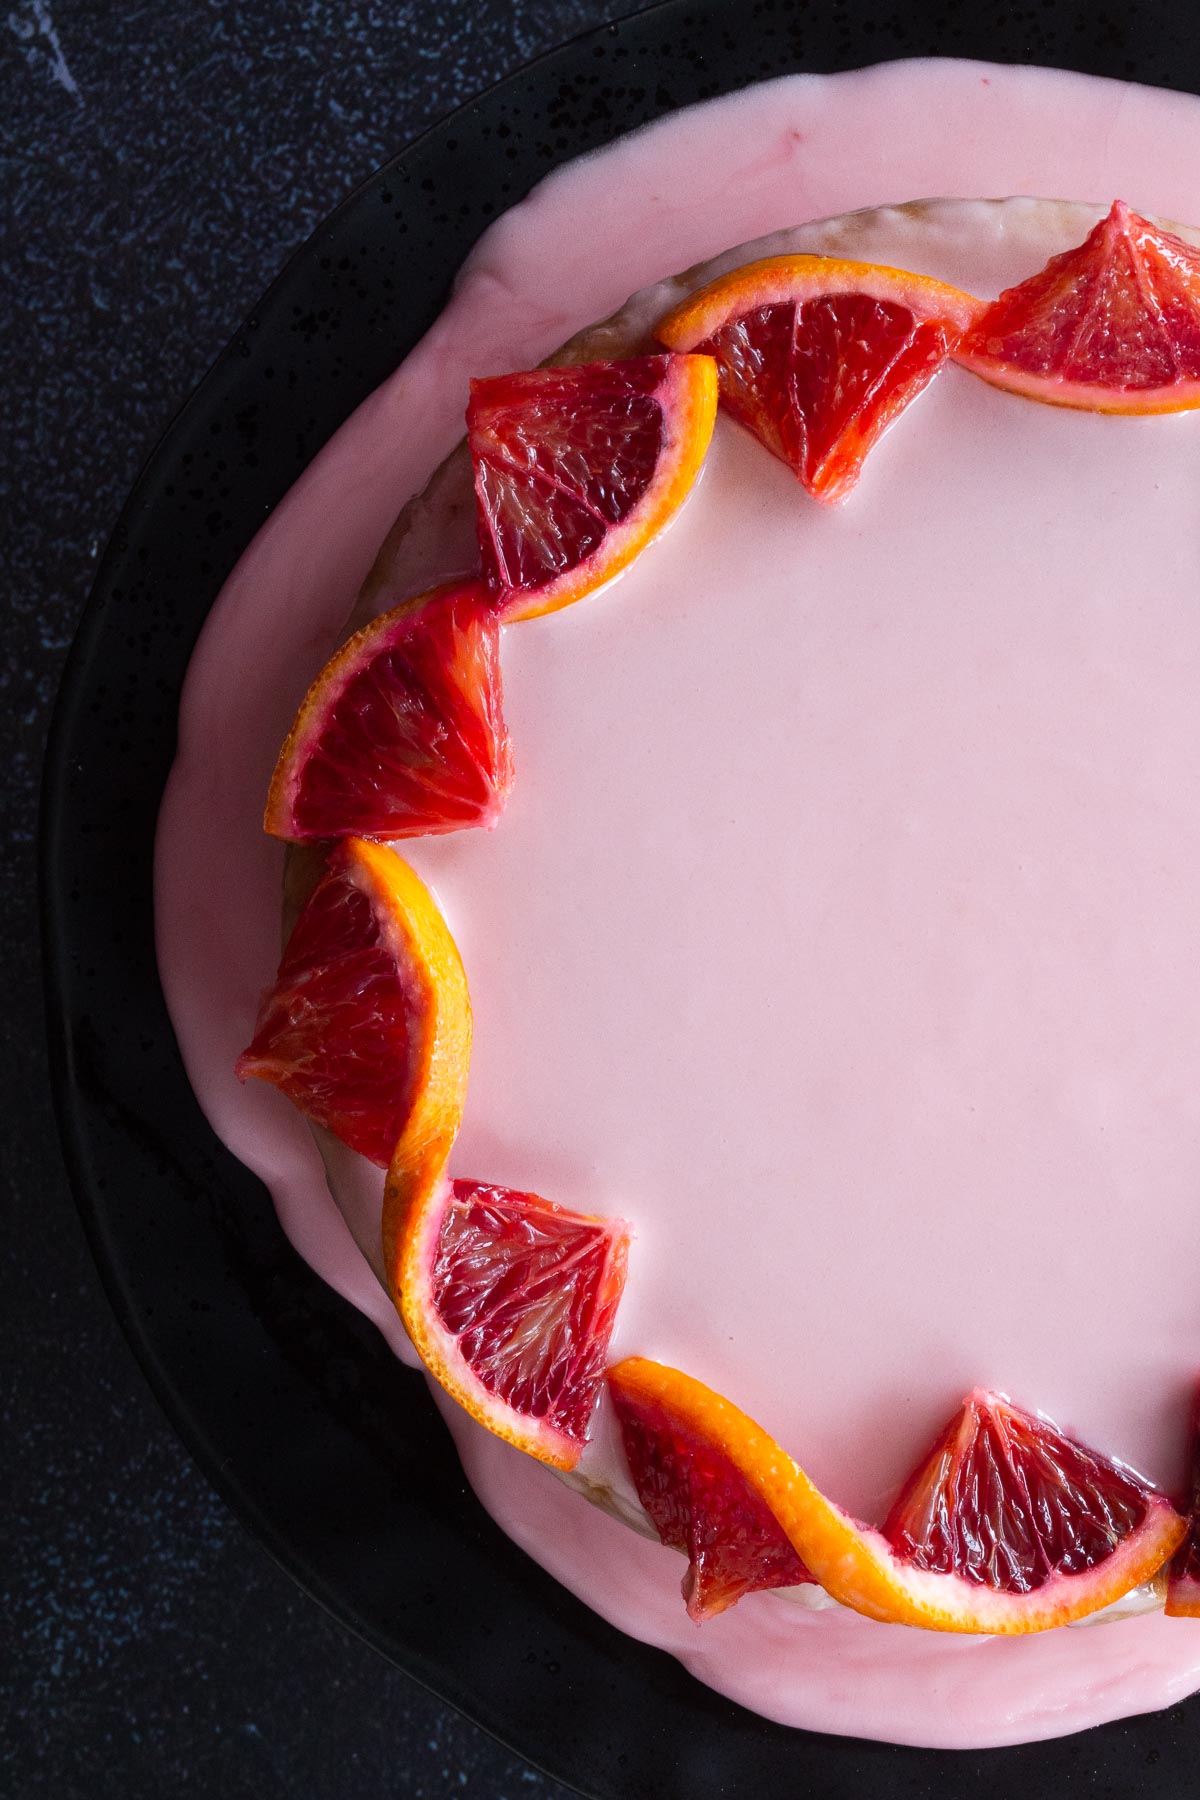
🍊 How to make the patterned orange decoration on top of the cake
- Slice blood oranges into 5mm thick slices
- Cut those slices into semi-circles
- Cut a slit in the middle of the flesh up to the pith line
- Twist the semi-circle so you can see the zest
- Place some of the twisted semi-circles carefully on the outer edge of the cake
🍫 How to make a chocolate water ganache
If a chocolate-blood orange combination floats your boat, here is how to make a simple chocolate water ganache - no dairy, no coconut... You do need a stick/immersion blender, a heat-proof glass measuring jug and a heatproof glass mixing bowl. An offset spatula is also helpful for applying to the cake, but a large spoon may also work.
The ganache can be made the day before and refrigerated before spreading over the cake. If you want a really smooth top, make the ganache the day you want to serve the cake - around 3 hours before serving is good.
I have no idea how this ganache travels - it's pretty soft, so I have only used it for cakes I've served at home. Less hot water and less maple syrup will give a firmer ganache that may be better for transporting the cake.
How to make
Add 140g dark chocolate* to the mixing bowl. You can either use a double boiler set up - where you place the bowl over a gently simmering saucepan with water on the stove OR on low power in the microwave for a few minutes (possibly longer depending on your microwave). You will need to stir every so often so that it melts evenly and doesn't burn. If using the microwave, check it every minute or so. Stop when it is about 90% melted.
Next, add 60g maple syrup to your measuring jug. Boil 170g water, and pour over the maple syrup - add the salt and stir well.
Next, add the melted chocolate and then blend with a stick/immersion blender - this may work in a regular blender but may be hard to remove it all. Let it sit for 20 minutes, then blend again.
If you are refrigerating the ganache for next day use, it takes around 6 hours to set and will be thicker.
If you want to use the ganache on the same day and have a smooth/shiny surface, don't put it in the refrigerator - pour it over the cake after you have blended it for a second time and it has cooled and thickened a little. The ganache should be pourable but thick. You can use an offset spatula - pour the ganache in the middle of the cake and gently push it to the edges. If you like, make some nice "drip" patterns over the side of the cake using the spatula and you may need to gently tip the cake plate to encourage the ganache to move down the side of the cake. Place the cake in the fridge uncovered - this will help the ganache set more, but it's intended to be soft even after setting.
*any dark chocolate bar should work - if you need it to be dairy-free or soy-free, check the label. It doesn't need to be baking chocolate. I like to use Lindt or even a nice bar from Aldi.
😋 Variations
- If you can't find blood oranges, or would like to make this cake with regular oranges, that is totally fine.
- For the hazelnut lovers, hazelnut meal would be amazing in this recipe in place of the almond flour. This can be made quite easily by grinding whole hazelnuts in a food processor or blender ...just avoid turning the hazelnuts in to butter!
🧡 Storage
The cake is best eaten on the day it's decorated with the glaze. It will store in the fridge for a few days after that, but the icing tends to separate.
🍰 Looking for more gluten-free cake inspiration?
My Aussie blogging friends have some wonderful gluten free cake options for you to enjoy.
Pear and Raspberry Cake from Alexandra at It's Not Complicated Recipes
Super light Almond and Pear Cake from Sylvie at A Baking Journey
Torta Caprese Flourless Chocolate Cake from Robyn at Mrs Jones's Kitchen (no relation!)
Vegan Gluten Free Chocolate Beetroot Cakes from Amanda at My Goodness Kitchen
💥 Recipe
🌟 Did you make this recipe? Leave a ⭐️⭐️⭐️⭐️⭐️ star rating and a comment below to let us know how it turned out. Save it for later by pinning to your favourite Pinterest board and make sure to tag us on Electric Vitality's Instagram to show off your cooking!
Whole Blood Orange Cake
Equipment
- Food processor or blendercooling rack*trivet,
- Chopping board and knife
- Spoon
- Instant Pot/multicooker/pressure cooker* OR an oven and a large saucepan/stockpot
- 18cm/7 inch or 20cm/8inch cake pan (for Instant Pot option - size depends on your model) OR 23cm/9 inch cake pan for the oven (a cheesecake pan works well too)
- Baking paper
- Aluminium foil for the Instant Pot/multicooker/pressure cooker option
Ingredients
Cake
- 680 grams blood oranges (2 medium and 2 small blood oranges or 1.5 lbs)
- 325 grams fine almond flour (3 cups. Not almond meal)
- ¾ - 1 cup raw sugar (aka turbinado. White granulated sugar is also fine to use)
- 1 ¼ teaspoon gluten free baking powder
- ½ teaspoon cooking salt
- 4 large eggs (at room temperature)
Glaze and decoration
- 500 grams blood oranges (4 small to medium or 1.1 pounds)
- 2 cups icing sugar/confectioner's sugar
- ½ teaspoon honey (optional)
Instructions
Instant Pot/Multicooker/Pressure Cooker
- Add 2 litres cups of water to the inner pot - fresh boiled water will bring the pressure up more quickly.
- Lock the lid, set to cook at high pressure for 10 minutes.
- Once the time is up, release pressure immediately, remove the oranges and set aside to cool.
- Allow to cool, cut in half.
- Remove any seeds, and the pedicels/stem ends (the parts that are where the orange is attached to the tree - you can pull them off).
- Place the orange halves in the food processor and blend well for a couple of minutes until most of the peel isn’t visible - it’s ok if there are still some visible pieces. Remove and discard any large segment walls you can see and do a final check to remove and discard seeds.
- Add the dry ingredients, blend again for a minute or two.
- Add the eggs and blend again. Scrape the sides down and blend again for 30 seconds. The batter will be relatively wet, this is normal.
- Grease and line an 18cm/7in or 20cm/8in cake pan with baking paper. Create a sling with aluminium foil. Place the cake pan on top of the sling.
- Pour the batter in to the cake pan.
- Smooth/even the top and spray lightly with oil.
- Cut a square of baking paper that will be large enough to cover the cake tin. Spray with oil, place the oiled side down over the cake pan and then place foil on top of that. Pinch the foil to help tighten it around the edges of the cake pan.
- Trim excess baking paper/foil and pinch/fold the foil tight again.
- Add 2 cups of fresh boiled water to the inner pot of the Instant Pot/pressure cooker.
- Place a trivet inside the inner pot.
- Pick up the cake pan by both sides of the sling - holding close to sides the pan - and then lower it into the inner pot to sit on the trivet. It may be a bit of a tight squeeze, ensure the cake pan is sitting flat and not on an angle.
- Fold the sides of the sling down over the top of the cake so the lid can be placed on the Instant Pot/pressure cooker correctly.
- Close and lock the lid, set the valve to seal and set the pressure cooker to cook on high for 60 minutes. Once the time is up, allow the pressure to release for 10 minutes.
- Open up the pressure cooker and - using gloves or a kitchen towel - carefully lift up the folded-over sling arms and lift out the cake tin with the sling.
- Place on a cooling rack and allow to cool for 2+ hours in the tin. The cake should only be sliced once it is completely cool. I recommend placing it in the fridge to help it set further to prevent breaking.
- Bring to room temperature before glazing, decorating and serving - this usually takes a couple of hours outside of the fridge.
- Store in the fridge for up to 4 days. FYI, the glaze/icing tends to separate after a while.
Stove top/Oven
- Cook oranges for 40 minutes in a stockpot with plenty of water, then remove from the water and set aside to to cool. If your oranges are small, they may only need 30 minutes - check at that point. If a knife goes through easily, they are ready. Cut in half and then remove any seeds, and the pedicels/stem ends (the parts that are where the orange is attached to the tree - you can pull them off).
- Preheat the oven to 170C/340F.
- Place the orange halves in the food processor and blend well for a couple of minutes until most of the peel isn’t visible - it’s ok if there are still some visible pieces. Remove and discard any large segment walls you can see and do a final check to remove and discard seeds.
- Add the dry ingredients, blend again for a minute or two.
- Add the eggs and blend again. Scrape the sides down and blend again for 30 seconds. The batter will be relatively wet, this is normal.
- Grease and line a cake pan. I recommend a size around 23cm/9 inches - a cheesecake pan will work as will a regular pan.
- Pour the batter in to the pan.
- Smooth/even the top and spray lightly with oil.
- Bake for 60 minutes and allow to cool completely in the pan before adding the glaze and serving. If using a cheesecake pan, I recommend removing the cake carefully by running a butter knife around the edge of the pan and carefully tipping the cake out (put a plate on top and flip it out) without releasing the latch on the cake pan. If making the cake the day before serving, store in the fridge and then bring to room temperature for a couple of hours before adding the glaze/icing.
Create the glaze and decorations
- Create the glaze only when the cake is completely cooled, and has come to room temperature. For best results, glaze the bottom of the cake not the top (as it's smoother).
- Sift the icing sugar/powdered sugar into a medium bowl. Add 2 tablespoons blood orange juice and ½ teaspoon honey if using. Stir with a large spoon to combine. Add ¼ teaspoon blood orange juice at a time as needed until your glaze is smooth, but still very thick - don't rush this by adding in too much. When you pick up your spoon, look for a drizzle of icing to stay on the surface of the bowl for about 10 seconds before it starts to melt back into the icing. If your icing is too thin, add more powdered sugar. If it's too thick, add more blood orange juice until you get the ideal consistency.Before pouring, tap the bowl on the kitchen bench a few times which will help remove any hidden air pockets in the icing.
- Pour the glaze over the cake - you may need to move it in a circular motion to help it cover the cake evenly.
- To make the blood orange decoration...slice blood oranges into 5mm thick slices. Cut those slices in to semi-circles then pat dry on both sides with paper towel - this prevents any bleeding.Cut a slit in the middle of the flesh up to the pith line. Twist the semi circle so you can see the zest curved on top. Place some of the twisted semi-circles carefully on the outer edge of the cake.
🍮 Other sweet recipes you'll love!
These Matcha Pistachio cookies will convert anyone to matcha.
I recently published the recipe for these winning Dark Chocolate Mochi cupcakes.
Gluten-free Baked Pancake can be customised to your tastes and is much easier than flipping endless pancakes!
This is such a gorgeous cake, the colour of that icing makes you want to dive straight in!
Thanks so much Sylvie - high praise indeed! 🙂